Ecommerce payment and shipping settings
Staff control which online payment methods the storefront shows, and the pincode-based shipping charges used at ecommerce checkout. Razorpay API keys stay in the backend environment — never in this admin form. Ops detail: repo file docs/RAZORPAY_SETUP.md.
Who can do this
| Setting | Where | Roles |
|---|---|---|
| COD / Razorpay toggles | Ecommerce → Products → Payment Options | Admin or Stock (/ecommerce/products) |
| Pincode shipping rates | Settings → Shipping | Admin only (/settings?tab=shipping) |
Settings → Payment (UPI QR / WhatsApp / support) is for counter POS and support contact — Payment and support settings — not website Razorpay/COD.
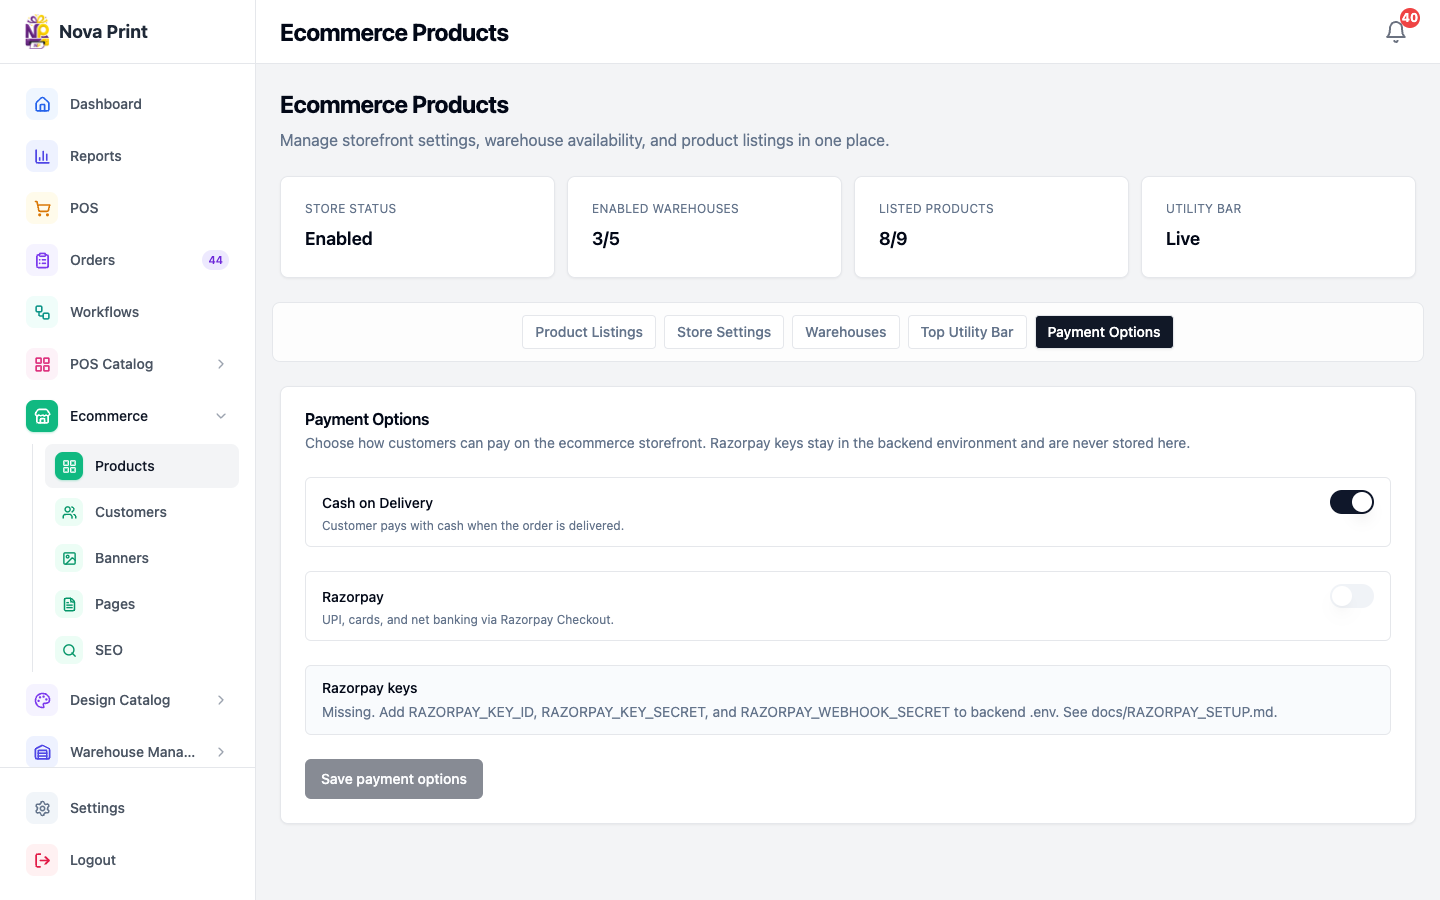
Payment Options (storefront COD / Razorpay)
- Open Admin Ecommerce → Products (
/ecommerce/products). - Open the Payment Options tab.
- Read the card Payment Options — Choose how customers can pay on the ecommerce storefront. Razorpay keys stay in the backend environment and are never stored here.
- Under Razorpay keys, confirm status:
- Configured in the backend environment. — safe to enable Razorpay
- Missing. Add RAZORPAY_KEY_ID, RAZORPAY_KEY_SECRET, and RAZORPAY_WEBHOOK_SECRET to backend .env. See docs/RAZORPAY_SETUP.md. — fix env and restart the API first
- Toggle Cash on Delivery (Customer pays with cash when the order is delivered.) and/or Razorpay (UPI, cards, and net banking via Razorpay Checkout.) as needed.
- Click Save payment options (busy: Saving…). Success toast: Payment options saved / Checkout will show the methods you enabled.
Rules enforced in the form:
- At least one method must stay enabled (toast Select a payment method if you try to save with both off).
- The Razorpay switch stays disabled when keys are not configured and Razorpay is currently off (toast Razorpay keys missing if you attempt otherwise).
Backend keys (staff / ops)
Before enabling Razorpay in admin (docs/RAZORPAY_SETUP.md):
- Set
RAZORPAY_KEY_ID,RAZORPAY_KEY_SECRET, and (for webhooks)RAZORPAY_WEBHOOK_SECRETon the API host. - Configure the Razorpay webhook to the API
…/api/ecommerce/payments/razorpay/webhook/URL with eventspayment.capturedandorder.paid. - Restart the API, then confirm Razorpay keys shows configured in admin.
Customer checkout behavior (no unpaid order until Razorpay succeeds; COD creates the order immediately) is described in Checkout (COD / Razorpay).
Shipping charges (pincode rates)
Checkout shipping for ecommerce uses Settings → Shipping, not the Payment Options tab.
- As Admin, open Settings → tab Shipping (
/settings?tab=shipping). - Section Shipping — India-wide pincode prefix charges used by ecommerce checkout and POS delivery orders.
- Set Default shipping (₹) — Used as the fallback charge when a PIN does not match any prefix.
- Edit Pincode prefix rates (JSON). Help notes longer prefixes win; example format
{"60": 50, "5": 80, "1": 100}. - Optional: use Pincode tester (placeholder 600001) to see which prefix and charge a 6-digit PIN would use.
- Click Save changes (toast Shipping rates saved).
Storefront checkout calls the shipping quote after the customer enters a 6-digit PIN.
Ecommerce Store Settings “Default Shipping (₹)”
On Ecommerce → Products → Store Settings there is also a Default Shipping (₹) field saved with store settings. Checkout charge resolution uses Settings → Shipping (default_shipping_cost + prefix map on app settings). Treat the Store Settings field as separate from the live quote path unless your team confirms otherwise — Verify in UI / ops if both values differ.
What is not in this admin UI
- Free-shipping thresholds, COD surcharges, or ecommerce pickup vs delivery toggles
- Editing Razorpay Key ID / Secret inside Admin (env only)
- Fulfillment warehouse checkboxes live on Ecommerce → Products → Warehouses — Listings and homepage — they do not set pincode prices